

oneseventhirteen/aeighttech – R9100 (Derek’s C60)
- May 22, 2017
- 6 min read
Di2 is all well and good but Shimano’s latest version of Dura-Ace is also available as a cable operated groupset too – I fitted the first one to Derek’s Colnago C60 recently…
First things first, have you ever seen a C60 frame that you don’t want to own?[1] If the answer’s yes then you may want to get your eyes, or maybe even your heart, checked out – William’s red C60 with the R9150 (Di2) group was a beautiful bike to build and this version with gloss black lugs and matt carbon tubing is just stunning.


Based upon bike fit details that have already been decided I start by cutting the fork to length. I always use one 5mm spacer on top of the stem height so that the stem clamps firstly onto the strongest part of the carbon fork steerer and then also onto the strongest part of the steerer bung (the metal bung that sits inside the steerer). The steerer is first cut to size, then filed smooth and then polished with emery cloth. When the Fizik stem is mounted I use a little carbon prep on the steerer to ensure a good strong clamp.
Then I mount the Dura-Ace mechanical brakes which are a thing of beauty and function – pretty much the strongest most positive feeling brake out there. Shimano have now moved the QR around to make the brake more aero. Next I mount up the shifters on the bar away from the bike, setting one in place first before matching up the second one – I do this by placing the bar and shifters on a flat surface and rocking the second lever until it sits in an identical position on the bar. When I’m happy with this I stick a little more carbon prep on the bar clamp and fit the handlebar to the bike.
The new wheels that Shimano have brought out have changed very little since last year, but thats no bad thing as the C24 carbon laminate versions that we are using for this build were already spot on. A slight redesign on the graphics has brought them up to date. One in, I take the bike out of the stand, fit the clients saddle and check the bikefit measurements. Often when you build a bike like this there will need to be tweaks and this time I’ve found that I can get the saddle in the perfect position straight away, but I decided to change the stem to correct the reach of the bike for the measurement that we were looking for – that’s why it’s important that a mechanic has a basic understanding of bikefitting, because if I’d persisted with the wrong size stem all of the cables would be wrong when we realised further down the road that the stem was too short.


Bikefit nailed it’s time to fit cables – Shimano have brought out a whole array of cable ends recently. Whilst many mechanics chuck these and build perfectly good bikes, I’ve noticed that if you use all the correct parts and employ a little fuel pipe in some crucial gunk traps, the shifting and braking will stay much more precise for a lot longer. These fittings along with Shimano’s polymer cables have kept my mountain bike and spare cross bike running sweetly all last season so I always make sure I use the best bits on a build like this. The brakes are easy to set up and clamp the same way as before but the mechs have changed slightly.


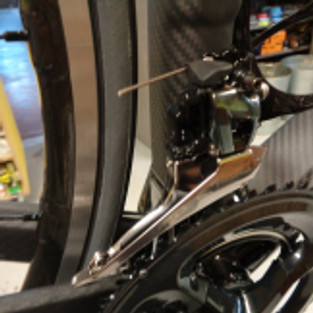
The rear mech bolts onto the frame via a small “direct mount” link – Shimano obviously hope that frame manufacturers will adopt the direct mount like they have on most new mountain bikes. This allows for a tighter chain line and helps protect the mech in the event of a knock or crash, but for now most frames will need the link plate in place. I clamp the cable up and put some tension on the mech to help stretch the cable. The front mech has a very unusual cable pull and clamp which again is designed to help tuck a bigger tyre in closer to the frame and also do away with the old inline cable adjuster. Like the rear mech I put some tension on the cable and then fit the BB and crank whilst the cables are stretching.
The BB’s are unchanged but the chainsets are completely new. Look out for an inbuilt powermeter version due in August, but for now you’ll just have to gaze in awe at the standard unit with its massive offset cranks. Another client of mine who’s traded up from Cannondale’s SISL cranks say that the difference in the positivity of the shift and the stiffness of the pedal stroke is the biggest single upgrade he’s ever made to any of his bikes.Once the crank and BB are fitted with plenty of Park grease I set the height and the yaw of the front mech. A lot of people miss the yaw adjuster when setting up 11 speed Shimano mechs but it’s very important and completely changes the feeling of the shift.


The front mech now features four adjusters and so I get the yaw correct first, then roughly adjust the lower bump stop which stops the chain falling off the frame side (I don’t always like using a chain catcher as the chain can get stuck underneath it in a crash, but I figured it would be best not to crash this bike in the first place and as Colnago supplies a nice branded catcher I’ve fitted it this time). Then I pull any excess cable through the front mech and clamp it tight – the new R9100 features a cable tidy which hides the bolt, clamp and excess cable. Likewise with the rear mech I remove any last stretch, wind the b-tension bolt all the way in, roughly set the bump stops and re clamp the cable in the highest gear position.
Now the chain can be fitted which I do first in the small/small combination before checking that the big/big combination of chainring and sprocket works too before cutting and joining the chain – this is important in this instance as we’re hoping to use a very slightly larger 11-32 cassette which Shimano claims isn’t recommended. I’ve always found that this is very much down to where the mech hanger sits on the bike and 50% of the time you can get away with a wider range than Shimano admits to – in this instance once the gears were fully set up I still had plenty of adjustment to play with. Once the chains on I stick the rear mech in the lowest gear and adjust the b-tension so that the pulley sits in the correct position away from the sprocket and then I adjust the low bump stops on both the front and rear mechs. Now I set the tension adjusters of both so that the chain moves from one gear to the next smoothly, until they are in the highest gears, where I set the high bump stops again front and back.


The final touch is to fit the bar tape and for a bike as beautiful as this I always try and add a little flare here. I’ll run through the gear and brake adjustments once more after the tape is fitted because this can sometimes alter the tension of the cables. A short test ride will then ensure that everything works as it should, before signing it off, taking some photos and then hanging the bike up somewhere safe to await its proud owner. Where possible I try and ride a few km’s with the client upon collection to make any final adjustments to position and it’s always lovely to see that first moment when a rider bonds with a new bicycle.


Photos by Glen Whittington.
Glen rides for the Southborough & District Wheelers. He races mountain bikes, road bikes, TT and ‘cross at local and national level. He receives personal support from Helly Hansen, Scott Sports, The Velo House, and the.æight.bicycle.cømpany. Glen runs The Velo House with Olly, a coffee shop, workshop and bike shop welcoming all cyclists and non-cyclists, based at 5 St.Johns Road, Tunbridge Wells, TN4 9TN – 01892 554 505 – glen@thevelohouse.com. He also contributes to Simpson Mag @eightbikeco #aeightracer
[1] ….or marry!


Comments